
Step-by-Step Natural Stone Restoration: Eco-Friendly Guide
TL;DR:
- Restoration of natural stone surfaces is affordable, effective, and eco-friendly for light to moderate damage.
- Proper identification of stone type and use of pH-neutral cleaners with gentle wet sanding are key to safe DIY repair.
- Consistent sealing and gentle maintenance prevent future damage and prolong the lifespan of stone surfaces.
You spent good money on marble countertops, limestone floors, or travertine pool tiles. Now they look cloudy, etched, or stained, and you're weighing two options that both feel wrong: pouring harsh chemicals on your surfaces or calling a contractor for a full replacement. Neither is necessary. Restoration is far cheaper than replacement, extends surface life by years, and works well for light to moderate wear with the right DIY approach. This guide walks you through every step of eco-friendly natural stone and pool tile restoration so you can bring your surfaces back to life without toxic products, wasted money, or unnecessary waste.
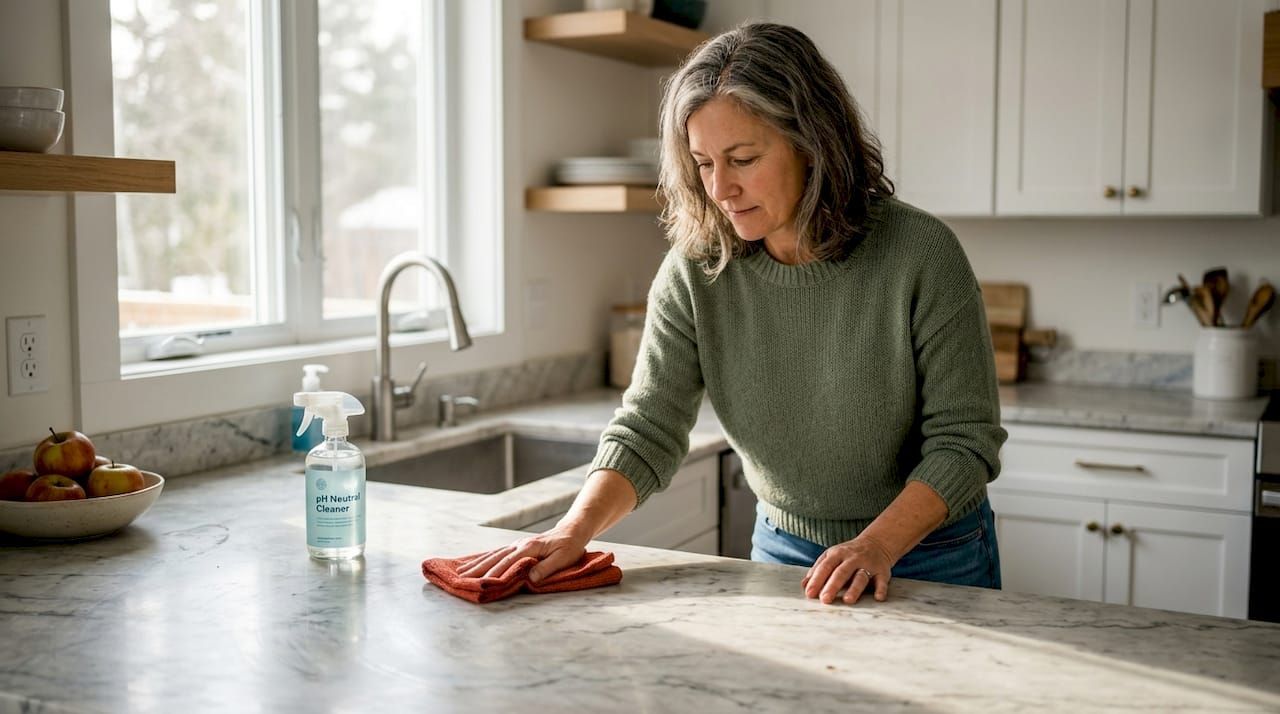
Table of Contents
- Assessing your stone: What you need before you begin
- Step-by-step stone restoration process
- Common mistakes and troubleshooting tips
- Verifying results and protecting your restored stone
- Our take: What really matters in eco-friendly stone restoration
- Eco-friendly solutions for ongoing stone care
- Frequently asked questions
Key Takeaways
| Point | Details |
|---|---|
| DIY can save money | Eco-friendly stone restoration is often much less expensive than replacement and can extend the lifespan by years. |
| Right tools matter | Choosing the correct materials and methods is crucial for effective, non-damaging results on natural stone. |
| Avoid common mistakes | Steer clear of harsh cleaners and excessive abrasion to prevent permanent surface damage. |
| Seal for longevity | Proper sealing and ongoing gentle care keep stone and tile surfaces looking their best longer. |
Assessing your stone: What you need before you begin
Understanding your surface and gathering the right materials are the first steps toward a successful restoration.
Before you pick up a sponge or sandpaper, you need to know exactly what you are working with. Natural stone is not a single material. Marble, granite, limestone, slate, and travertine all have different hardness levels, porosity ratings, and sensitivities to cleaning products. Using the wrong approach on the wrong stone can make the problem significantly worse. A cleaner safe for granite may etch a marble surface within seconds.
Start by identifying your stone type. If you are unsure, check any leftover tiles from installation, ask your contractor, or use a simple water drop test. Place a few drops of water on the surface. If it absorbs quickly, your stone is porous and needs gentle, careful treatment. If water beads up, the stone is denser and may tolerate slightly more scrubbing pressure.
Here is a quick reference to common stone types and what they respond to best:
| Stone type | Common problems | Recommended DIY approach |
|---|---|---|
| Marble | Etching, dullness, staining | Wet sanding with 400-grit, pH-neutral cleaner |
| Limestone | Surface erosion, yellowing | Gentle scrub, avoid all acids |
| Granite | Staining, grease buildup | pH-neutral degreaser, no abrasion |
| Travertine | Pitting, mineral deposits | Calcium releaser, soft brush |
| Slate | Flaking, fading | Dry buffing, sealing |
| Pool tile | Calcium scale, grout staining | Calcium releaser, grout brush |
Once you know your stone type, gather your supplies. For light to moderate issues, DIY restoration with 400-grit wet sandpaper and a quality stone cleaner is completely manageable without professional equipment. You do not need a rental machine or specialty contractor.
Essential eco-friendly supplies:
- 400-grit wet or dry sandpaper (multiple sheets)
- pH-neutral stone cleaner (plant-based, biodegradable preferred)
- Microfiber cloths, at least three to four
- Spray bottle filled with clean water
- Soft-bristle brush for grout lines
- Protective gloves and safety glasses
- A well-lit work area
Invest in top eco-friendly stone cleaners that are free from acids, ammonia, and bleach. These harsh ingredients can strip the stone's natural finish and open up the surface to more staining down the line. When choosing safe cleaners for natural stone, look for pH values between 6 and 8, biodegradable formulations, and no synthetic fragrances or VOCs.
Pro Tip: Always spot test any cleaner or sandpaper technique in a hidden area, such as behind a cabinet or under a rug edge, before committing to the full surface. Wait 10 minutes and check for discoloration or texture changes before moving on.
Step-by-step stone restoration process
With supplies ready, here is exactly how to revive your natural stone safely and responsibly.
Patience is the single most important ingredient in this process. Rushing leads to uneven finishes and potential surface damage. Work in small sections, no larger than a square foot at a time, so you maintain full control and can check progress as you go.
- Remove loose debris. Sweep or vacuum the surface to remove all loose dirt, grit, and particles. Skipping this step means you will grind debris into the stone during sanding, causing scratches you did not start with.
- Pre-clean with a pH-neutral cleaner. Spray your cleaner generously over the section you are working on. Let it sit for two to three minutes to loosen surface grime, oils, and light mineral deposits. Wipe with a damp microfiber cloth in gentle, circular motions. Do not scrub hard at this stage.
- Wet sand light etches and stains. Fold your 400-grit sandpaper into quarters. Wet it thoroughly under running water. Using light, circular hand pressure, work over etched or stained areas. Keep the surface and paper wet at all times. You are not trying to grind away material. You are gently leveling the surface. Check your progress every 30 seconds by wiping the area clean with a damp cloth.
- Rinse and second clean. Once you are satisfied with the etch or stain area, rinse with clean water and apply your pH-neutral cleaner again. This removes any fine stone dust and residue from the sanding step.
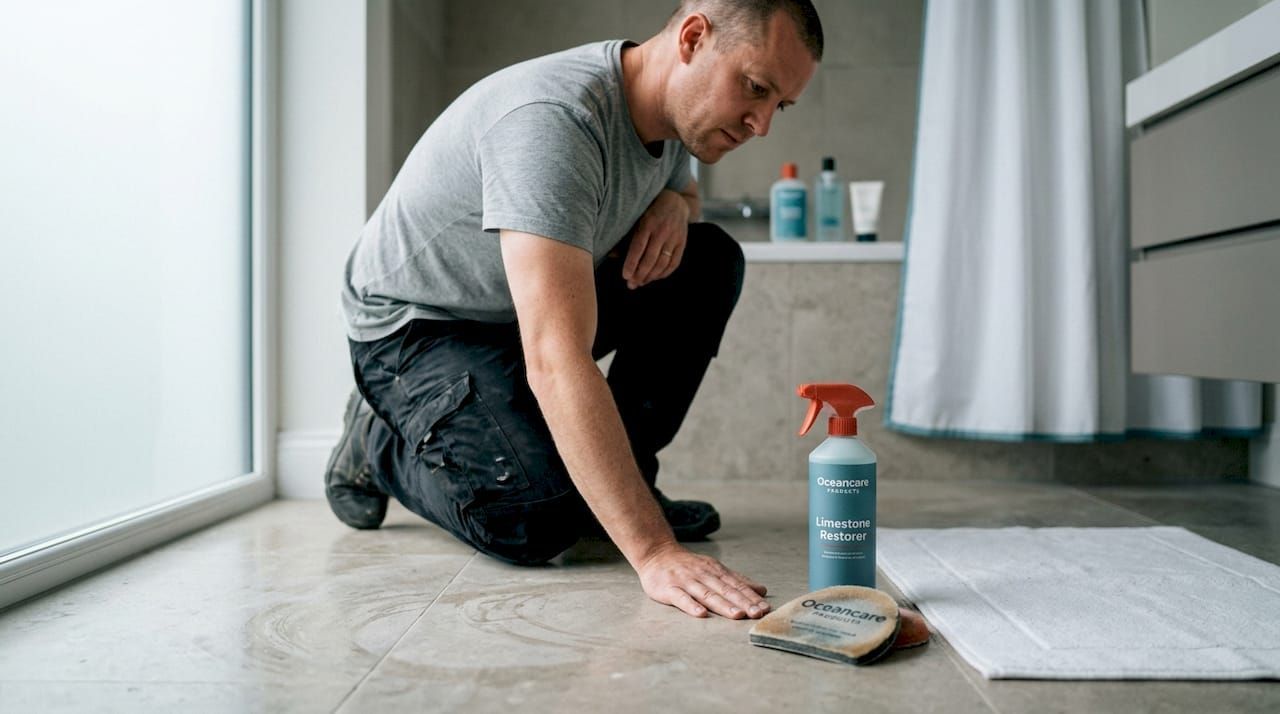
- Dry and buff. Use a dry microfiber cloth to buff the surface in wide, sweeping circles. This step brings out the stone's natural luster. For pool tiles, use a soft-bristle brush along grout lines before drying.
Safety note: Always wear gloves throughout this process. Stone dust, even from light sanding, can irritate skin and lungs. If you are working indoors, open windows and keep the room well ventilated to reduce airborne particles.
Here is how DIY eco-friendly restoration compares to hiring a professional:
| Factor | Eco-friendly DIY | Professional restoration |
|---|---|---|
| Cost | $20 to $60 in supplies | $300 to $1,500+ per area |
| Tools needed | Sandpaper, cleaner, cloths | Rotary machines, diamond pads |
| Environmental impact | Low (plant-based products) | Moderate to high (chemical sealers) |
| Best for | Light etches, surface stains | Deep scratches, widespread damage |
| Time required | 1 to 3 hours per area | Half day to full day |
| Results | Good for minor wear | Excellent for severe damage |
Full restoration of damaged stone often requires professional rotary machines and diamond polishing pads. But for the everyday homeowner dealing with minor surface issues, the DIY route is surprisingly effective when done correctly.
To avoid frustration, review common mistakes when using neutral cleaners before you start. One of the most overlooked aspects of restoration is the ongoing prevention side. Learn more about preventing tile stains naturally so your restored surface stays cleaner for longer. Natural stone care methods used across European stone restoration practices emphasize consistent, gentle maintenance over aggressive periodic treatments.
Pro Tip: Keep your sandpaper wet throughout the entire sanding process. The moment it dries out, friction increases and you risk creating micro-scratches that are harder to remove than the original etch. Work slowly and check your progress frequently.
Common mistakes and troubleshooting tips
Even careful DIYers can make mistakes. Here is how to sidestep the most common ones and fix issues before they become permanent.
The single most damaging error people make is reaching for the wrong cleaner. Vinegar, lemon juice, bleach, and most bathroom tile sprays are all acidic or chemically aggressive. On marble or limestone especially, they cause etching and surface degradation that is far more expensive to fix than the original problem you were trying to solve.
Most common DIY restoration errors and quick fixes:
- Using acidic cleaners on marble or limestone: If this happens, rinse immediately with plenty of water. Allow the surface to dry completely, then assess the new etching before attempting the wet sanding step.
- Over-scrubbing a single spot: This creates an uneven low point in the surface, which becomes visible in raking light. Fix by gradually working outward from the center of the spot in a wider circular pattern to blend the surface.
- Letting sandpaper dry out: Stop, re-wet, and inspect the area for new micro-scratches. If scratches are visible, switch to a finer grit (600-grit) to smooth them before buffing.
- Skipping the pre-clean step: Dirt trapped under sandpaper creates deep scratches. If this happens, clean the area thoroughly and re-assess whether re-sanding is needed.
- Not wearing gloves or eye protection: Stone dust and cleaning products can cause skin and eye irritation. Always protect yourself, especially when working on large areas.
Important: If you see a white haze or cloudiness spreading beyond the area you worked on, stop immediately. This can indicate surface damage that requires professional assessment before further DIY attempts.
Understanding the benefits of sealing natural stone is critical here because many recurring problems trace back directly to inadequate sealing after previous cleanings or restorations. A properly sealed surface resists staining and etching far better than an unsealed one. When the time comes to seal, use the resources available for choosing the right stone sealer for your specific floor or surface type, since sealers vary by porosity and stone category.
Pro Tip: If a stain persists after two careful wet sanding sessions, do not keep sanding. Stubborn discoloration may have penetrated below the surface layer and needs professional poultice treatment or re-honing. Knowing when to stop is a skill, not a failure.
Verifying results and protecting your restored stone
After restoration, it is essential to confirm your results and protect your investment.
Do not assume the job is finished just because the surface looks better in the moment. Natural stone is one of those materials where results need to be checked under different conditions before you declare success.
At-home tests for restoration success:
- Lighting test: Hold a flashlight or phone light at a low angle across the surface. This "raking light" technique reveals any remaining uneven spots, scratches, or dull patches that disappear under direct overhead light.
- Water bead test: Drip a small amount of water on the restored area. Water should bead up on properly finished marble or granite. If it absorbs immediately, the surface needs sealing before it attracts new stains.
- Touch test: Run clean, dry fingertips across the surface. You should feel a smooth, consistent texture without ridges or rough patches.
- Color consistency check: Compare the restored area with an untouched nearby section under natural daylight. The finish should look uniform without bright or dark spots.
- Grout inspection: For pool tiles, check that grout lines are clean, intact, and free of calcium deposits or discoloration.
Proper restoration extends stone surface life significantly and delays the need for costly professional resurfacing or full replacement. Sealing is the most important follow-up step after any restoration. An eco-friendly, low VOC sealer applied to a clean, dry surface locks out moisture, oils, and minerals so your work lasts.
Maintain your restored surfaces with a routine cleaning schedule. A weekly wipe-down with a pH-neutral cleaner takes less than 10 minutes and prevents the gradual buildup that leads to etching and staining in the first place. Learning how to clean tile floors with sealers properly ensures you are not inadvertently breaking down the protective layer with the wrong products.
Our take: What really matters in eco-friendly stone restoration
Most guides on stone restoration focus on the steps and tools. Fewer talk honestly about the bigger picture of what sustainable surface care really means and why it matters beyond the immediate results.
Here is what we have learned after working with homeowners and property managers across all kinds of stone surfaces: the vast majority of serious damage we see was preventable. It rarely comes from one dramatic incident. It builds slowly from repeated use of the wrong daily cleaner, skipping sealing after installation, or waiting until damage is severe before taking action. By the time most people start looking for a restoration guide, the surface has already absorbed years of preventable wear.
Eco-friendly does not mean less effective. In fact, gentle plant-based cleaners often outperform aggressive chemical products in long-term surface care because they do not strip protective layers or accelerate porosity. Harsh chemicals might look like they are working harder in the moment, but they are shortening your stone's life with every application.
The smartest investment you can make after restoration is prevention. A quality eco-friendly sealer, applied every one to three years depending on traffic and exposure, is worth more than any restoration product. Think of sealing as sunscreen for your stone. You apply it before damage occurs, not after. Explore sustainable protection with natural sealers to understand the options available and how to match the right sealer to your specific surface.
DIY restoration genuinely handles about 80% of the surface issues homeowners encounter. Light etches, minor stains, surface haze, and calcium scale on pool tiles all respond well to the methods described in this guide. The remaining 20%, deep scratches, widespread structural damage, or large-scale discoloration, belongs in a professional's hands. Knowing which category your problem falls into before you start saves both time and money.
Eco-friendly solutions for ongoing stone care
Ready to take the next step in preserving your stone and tile surfaces?
Restoring your stone is only half the journey. Keeping it in excellent condition over the long term requires the right products and a consistent, eco-conscious routine that protects both your home and the environment.
At Oceancare Store, we have built our entire product line around what works for natural stone, pool tiles, and grout without the toxic trade-offs. Whether you are starting fresh with eco-friendly cleaning essentials for your routine, reaching for a trusted pH-neutral stone cleaner for everyday maintenance, or tackling heavy buildup with an intensive stone cleaner for deeper restoration work, our formulations are biodegradable, plant-based, and safe for the whole household. Every product is chosen with the same principle in mind: protect your surfaces and respect your environment at the same time.
Frequently asked questions
What is the safest way to remove light etching from marble or limestone at home?
Use wet 400-grit sandpaper with a pH-neutral cleaner, working gently in circular motions, then wipe the area clean with a damp microfiber cloth and buff dry.
Why is pH-neutral cleaner important for natural stone?
A pH-neutral cleaner prevents surface damage that harsh acids or bases can cause to stone and grout, keeping the surface intact and reducing the risk of new etching or staining.
Can DIY restoration replace professional stone resurfacing?
DIY is effective for minor etches and stains, but deep damage or widespread clouding requires professional-grade rotary machines and diamond pads that go beyond what home tools can achieve.
How can I keep my restored stone surface looking new?
Regular eco-friendly cleaning and periodic sealing will lock out moisture, resist staining, and preserve your stone's finish for years between major restoration efforts.

