
Achieve spotless pool tiles with a low VOC cleaning process
TL;DR:
- Using low VOC cleaners for pool tiles and natural stone reduces chemical exposure, environmental impact, and surface damage.
- Proper application involves thorough rinsing, agitation, and inspection to prevent residue buildup and preserve surface beauty.
You've scrubbed diligently, rinsed thoroughly, and still your pool tiles look dull, streaked, or stained within days. That cycle of effort without results is exhausting, and for many homeowners, the culprit isn't their technique. It's the cleaner itself, leaving behind chemical residues, harsh fumes, and a surface that looks worse over time. Low VOC cleaning breaks that cycle by using formulas that work with your surfaces rather than against them, protecting both your tile investment and the health of everyone who uses the pool.

Table of Contents
- Why switch to low VOC cleaners for pool tile and natural stone
- Gathering your tools and choosing certified low VOC cleaners
- Step-by-step low VOC cleaning process for pool tiles and natural stone
- How to prevent residues and maintain long-term surface quality
- What most guides miss about low VOC pool tile cleaning
- Eco-friendly tile care solutions for lasting results
- Frequently asked questions
Key Takeaways
| Point | Details |
|---|---|
| Low VOC means safer cleaning | Switching to low VOC products protects your health and keeps pool tiles and stone surfaces pristine. |
| EPA certification matters | Look for EPA Safer Choice labels to ensure product safety and reliable performance. |
| Proper dwell and rinse time | Let cleaners sit 5–10 minutes and always rinse thoroughly to prevent residue buildup. |
| Technique beats marketing | How you clean is as important as what you use; follow evidence-based steps for best results. |
| Avoid letting detergent dry | Drying dirty solution creates difficult residue, so remove rinse water promptly after cleaning. |
Why switch to low VOC cleaners for pool tile and natural stone
VOC stands for Volatile Organic Compound. These are chemicals that evaporate at room temperature and release gases into the air around you. In conventional tile and stone cleaners, VOCs are often present in solvents, fragrances, and preservatives. Prolonged exposure can trigger headaches, respiratory irritation, and long-term health concerns, especially in enclosed outdoor spaces where airflow may be limited around a pool deck or enclosed patio.
Switching to low VOC products reduces your exposure significantly. It also means less chemical runoff into pool water and surrounding soil, which matters if you have landscaping, pets, or a saltwater system nearby. Eco-friendly cleaning tips point to reduced environmental impact as one of the clearest benefits of making the switch at home.
Here's what you gain with low VOC cleaners:
- Safer indoor and outdoor air quality during and after cleaning
- Reduced chemical contact for skin and eyes
- Lower risk of discoloring or etching sensitive natural stone like travertine, limestone, or slate
- Less environmental impact through biodegradable, plant-based formulas
- Surfaces that stay cleaner longer because residue buildup is minimized
When choosing safe home cleaners, look for the EPA Safer Choice label. This certification program reviews every ingredient in a product and confirms it meets strict safety and performance standards.
"EPA Safer Choice helps consumers find products with safer ingredients while still performing effectively for the task at hand."
Low VOC cleaning also preserves the appearance of your tile and stone over time. Harsh chemicals strip sealers, accelerate grout degradation, and leave a hazy film that attracts dirt faster. When you make the switch, you're not just cleaning more safely, you're cleaning more effectively. Learning about preventing tile stains naturally is a natural next step once you've adopted a safer cleaning routine.
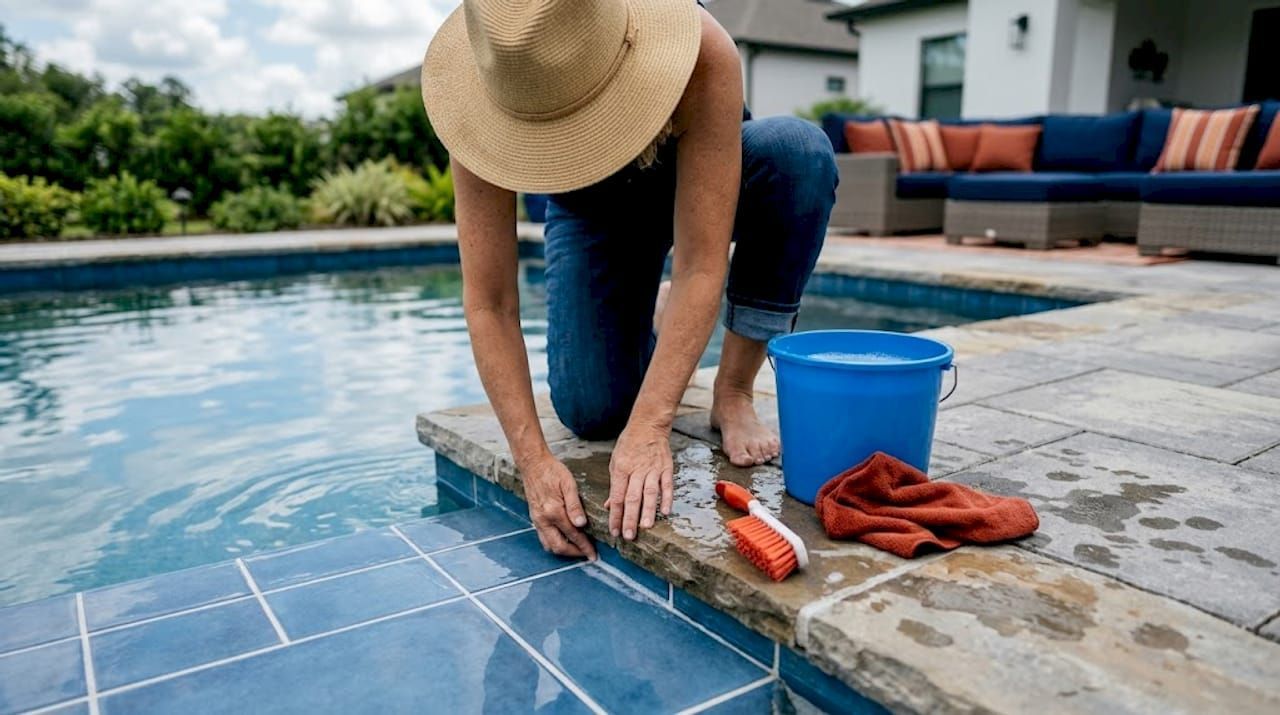
Gathering your tools and choosing certified low VOC cleaners
The right tools make a measurable difference. Before you apply any cleaner, gather everything you need so the process flows smoothly from start to finish. Running back to find a brush or a second bucket mid-clean interrupts dwell time (the period the cleaner sits on the surface to break down soils) and can lead to uneven results.
Here's your complete tool checklist:
- EPA Safer Choice certified low VOC cleaner, properly diluted per label instructions
- Nylon scrub pad or natural bristle brush (avoid metal brushes on natural stone)
- Wet vacuum or several dry microfiber towels for thorough residue removal
- Rubber gloves, even with safer formulas
- Clean water supply for rinsing
- Bucket for dilution mixing
- Optional: soft floor squeegee for large flat surfaces
When selecting your cleaner, the EPA Safer Choice program is your most reliable guide. Look for the logo on the label and cross-reference the product's safety data sheet to confirm the VOC content is low. Hard surface cleaning best practices recommend checking for plant-derived surfactants and the absence of phosphates, chlorine bleach, and synthetic fragrances.
Here's a side-by-side comparison to help you see why the choice matters:
| Feature | Low VOC certified cleaner | Conventional cleaner |
|---|---|---|
| VOC levels | Minimal to none | Often high |
| Health risk during use | Low | Moderate to high |
| Residue risk after drying | Low with proper rinsing | Moderate to high |
| Rinsing requirements | Thorough, one pass | May require multiple passes |
| Safe for natural stone | Yes, acid-free formulas available | Often not, can etch or discolor |
| Environmental impact | Biodegradable, low runoff risk | Chemical runoff potential |
| Surface sealer compatibility | Compatible with most sealers | Can degrade sealers over time |
As Crossville's porcelain tile care guide notes, low VOC and non-hazardous products combined with correct dilution and thorough rinsing are the foundation of lasting tile care. This applies equally to natural stone, glass mosaic pool tiles, and grouted surfaces.
Pro Tip: A more concentrated cleaner is not always more effective. Higher concentrations require longer and more thorough rinsing to remove all active ingredients. Follow the dilution ratio on the label precisely and you'll get better results with less effort. You can find guidance on pool tile cleaner types to match the right formula to your specific surface.
Step-by-step low VOC cleaning process for pool tiles and natural stone
This is where preparation pays off. The steps below are organized in sequence, and skipping any one of them, especially rinsing, is where most surface damage and residue problems begin.
Follow these steps in order:
- Sweep or vacuum the area. Remove loose debris, leaves, and grit before applying any liquid cleaner. Dirt particles dragged across wet tile can cause micro-scratches, particularly on polished natural stone.
- Mix your cleaner to the recommended dilution. Read the label carefully. Many low VOC cleaners are highly concentrated and require mixing with water before use.
- Apply the cleaner evenly across the surface. Work in manageable sections (roughly 10 to 15 square feet at a time) to maintain control over dwell time.
- Allow a dwell time of 5 to 10 minutes. This is the window in which the cleaner breaks down calcium deposits, body oils, algae residue, and grime. Do not let it dry.
- Agitate with a nylon brush or bristle pad. Use firm, overlapping circular motions on grout lines and tile faces. For natural stone, use lighter pressure to avoid scratching the surface finish.
- Extract the dirty solution immediately. Use a wet vacuum for best results, or use dry microfiber towels in an overlapping pattern to absorb the detergent and lifted soils.
- Rinse with clean water. A fresh water rinse removes any remaining cleaner and prepares the surface for drying.
- Dry completely. Air dry or use a clean dry towel. Do not seal the surface until it is fully dry.
For more detailed guidance on grout lines specifically, grout cleaning steps cover the process from application through sealing.
"If dirty detergent solution is not removed and is allowed to dry, a coating will form which is very difficult to remove." — Crossville Care and Maintenance Guide
Here's a quick reference table for the full cleaning process:
| Step | Action | Recommended tool | Time |
|---|---|---|---|
| 1. Prep | Sweep or vacuum surface | Broom or dry vacuum | 5 minutes |
| 2. Dilute | Mix cleaner per label | Bucket | 2 minutes |
| 3. Apply | Spread evenly in sections | Mop or spray bottle | 3 minutes per section |
| 4. Dwell | Let cleaner sit and work | None (wait) | 5 to 10 minutes |
| 5. Agitate | Scrub surface and grout | Nylon brush or pad | 5 minutes per section |
| 6. Extract | Remove dirty solution | Wet vac or towels | 3 to 5 minutes |
| 7. Rinse | Flush with clean water | Hose or clean mop | 3 minutes |
| 8. Dry | Remove moisture | Dry towels or air dry | 10 to 20 minutes |
Pro Tip: Never walk away during the dwell phase. Set a timer if needed. If the cleaner dries before you agitate and extract, you'll spend twice as long removing the residue it leaves behind. Consistent attention during eco-friendly surface care routines is what separates a one-time fix from a long-term result.
How to prevent residues and maintain long-term surface quality
Even a perfect cleaning process can produce disappointing results if you skip the verification step. After drying, take two to three minutes to inspect the surface carefully before considering the job done.
Use this checklist to verify the surface is fully clean:
- No hazy or white film visible under normal light
- Grout lines are uniformly colored with no dark wet patches remaining
- Tile surfaces feel smooth and slightly tacky, not slick or coated
- No soapy smell remains on the surface
- Water beads naturally on sealed surfaces rather than soaking in
Pro Tip: Shine a flashlight at a low angle (almost parallel to the surface) to reveal streaks, residue patches, or uneven finish that normal overhead lighting hides. This simple trick catches problems before they become permanent.
Signs of residue and how to handle them:
- White haze or film: This is dried detergent. Rewet the area immediately, scrub, and extract again with a wet vacuum before the solution dries a second time.
- Slick or greasy feel: Indicates incomplete extraction. Add a second rinse pass with clean water and dry thoroughly.
- Dark grout lines after drying: Can signal trapped moisture or a film left in porous grout. A second targeted scrub with a stiff brush and clean rinse water typically resolves it.
Rinsing completeness is one of the most critical factors for long-term tile and stone appearance. It's also the step most people rush. For additional maintenance strategies including stain prevention between cleaning sessions, preventing tile stains offers practical, chemical-free approaches.
Here are the most common mistakes that undermine long-term surface quality and how to avoid them:
- Using too much cleaner: More product does not mean better results. Excess cleaner means more residue risk.
- Skipping the wet vacuum: Mopping dirty solution around spreads it. Extraction removes it.
- Cleaning in direct sunlight: Heat accelerates drying and shortens dwell time. Clean in the shade or during cooler parts of the day.
- Sealing too soon: Applying sealer over a damp or slightly residue-coated surface traps the problem underneath. Wait for a fully dry, clean surface. For a broader look at sustainable habits, a chemical-free cleaning guide offers transferable strategies from other surface types.
What most guides miss about low VOC pool tile cleaning
Here's a truth most product marketing avoids: the cleaner you choose matters far less than how you use it. We've seen homeowners switch to premium certified low VOC formulas and still end up with streaky, dull tile because they skipped extraction or let the solution dry on the surface. The product gets the blame, but the method was the problem.
The eco label on a cleaner tells you it was made responsibly. It does not guarantee your result. That guarantee comes from dwell time, agitation, and complete removal of the dirty solution. These are the unglamorous parts of the process, but they are the real variables. A basic certified cleaner used correctly will outperform a premium one used carelessly every single time.
"Proper rinsing is arguably the most overlooked but critical factor in tile and stone maintenance."
There's also a tendency to assume that plant-based and biodegradable formulas are inherently gentle on all surfaces. Some are, and some are not. Natural stone, especially marble and limestone, reacts badly to acidic cleaners, even plant-derived ones like citrus-based formulas. Always check if the product is specifically labeled as pH-neutral and safe for natural stone before applying it.
Pro Tip: Always read the manufacturer's instructions even for products you've used before. Formulations change, surface sensitivities vary, and what worked well on ceramic tile last season may behave differently on newly installed travertine. For eco-friendly grout care, this caution is especially important since grout is porous and absorbs both the cleaner and any residue it leaves behind.
The most effective low VOC cleaning isn't about finding a magic product. It's about committing to a repeatable process: prep, apply, dwell, agitate, extract, rinse, and verify. Do that consistently and your pool tile and natural stone will stay beautiful for years without chemical exposure or unnecessary damage.
Eco-friendly tile care solutions for lasting results
Maintaining pool tiles and natural stone with low VOC products is a commitment worth making, and having the right products ready makes that commitment easier to keep.
At The Oceancare Store, our home essential cleaners are specifically formulated for pool tiles, natural stone, and grout, using plant-based, biodegradable ingredients with minimal VOC content. Each product is designed to work with your surface rather than against it, protecting sealers and finishes while eliminating buildup safely. If you're building your full eco-friendly toolkit, our guide to eco-friendly cleaning essentials walks you through the must-have products for every surface in and around your home. Cleaner tile, safer air, and longer-lasting surfaces start with the right formula.
Frequently asked questions
What makes a cleaner low VOC?
A low VOC cleaner has reduced levels of volatile organic compounds, minimizing harmful emissions and improving air quality around pools and indoor surfaces. Products certified by EPA Safer Choice meet this standard while still performing effectively.
Is EPA Safer Choice certification important for tile cleaning?
Yes, it verifies that the cleaner uses safer ingredients and meets both human health and environmental safety standards. The EPA Safer Choice program reviews every ingredient, not just the active ones, giving you a more complete picture of what you're using.
How long should low VOC cleaners dwell on pool tile surfaces?
Allow the cleaner to sit for 5 to 10 minutes before agitation to ensure effective soil removal. As manufacturer care guides confirm, correct dwell time combined with thorough rinsing is key to lasting results.
Can residue be left behind after low VOC cleaning?
Yes. If dirty detergent solution is not fully extracted and rinsed, a hard-to-remove coating can form on the surface. Rinsing completeness is one of the most critical factors for long-term tile and stone appearance.

