
3 DIY Tests That Stop Paver Sealer Problems for Homeowners
Most paver sealer problems trace back to one of three culprits: trapped moisture in the pavers or base, the wrong sealer for your climate, or rushed surface prep. Widespread whitening or peeling across a large area is your signal to act now, not next weekend. Stay off the surface, snap photos of the affected zones, pull up your sealer's product label and check the weather from the past 48 hours, then test a small hidden patch before deciding on a full remediation plan.
TL;DR:
- Sealer failure often results from moisture trapped beneath the surface, incompatible products for climate, or improper surface preparation, not from bad batches.
- Peeling, whitening, or efflorescence indicates different issues, requiring specific tests like the xylene spot check—peeling sealer may be temporarily fixed with solvent, while extensive damage needs full stripping.
- Proper timing, weather conditions, surface cleaning, and the right sealer chemistry are critical to prevent failures, including waiting 8 to 12 weeks after installation before sealing.
- Easy fixes like spot cleaning or targeted stripping can often restore the surface, but widespread problems typically demand professional intervention to remove and reseal properly.
- Eco-friendly, low-VOC products for repair and prevention are available, but severe failures still require stronger chemical strippers, especially with solvent-based coatings.
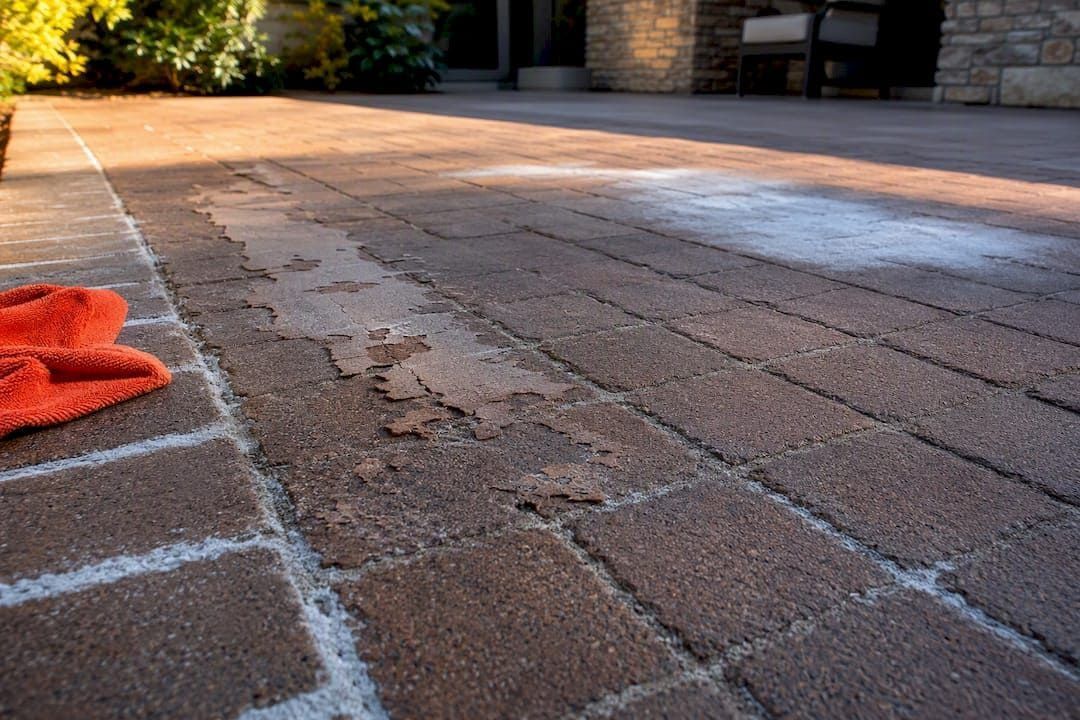
Table of Contents
- Diagnosing Common Paver Sealer Issues
- Why Paver Sealers Fail in the First Place
- Fixing Failed Paver Sealer: A Step-by-Step Repair Path
- Preventing Paver Sealer Problems Before They Start
- The Eco-Friendly Approach to Paver Sealer Repair and Prevention
- What Contractor Shortcuts Actually Cause These Failures
- Where to Find Eco-Friendly Sealer Repair and Prevention Products
- Sources
- FAQ
Diagnosing Common Paver Sealer Issues
Not every discolored patio needs a full strip and reseal. Some problems clean off in an afternoon. Others mean your sealer has failed structurally and needs to come off completely. Telling the difference starts with your eyes, then your hands, then a small test patch.
Peeling and flaking shows up as a visible film lifting or curling at the edges, usually near high-traffic zones or where water pools. You can often catch the edge of the film with a fingernail and pull up a flake. This almost always means the sealer lost adhesion to the paver surface, often from moisture pushing up from underneath during cure.
Whitening or blushing looks like a milky, cloudy haze sitting inside the sealer film itself, not on top of it. It tends to appear in patches or streaks rather than evenly across the whole surface. This happens when moisture gets trapped in the film before it fully cures or when the coalescence process never finished properly, a mechanism ChemMasters documents in detail for water-based acrylic sealers.
Efflorescence is different from both. It's a powdery, chalky white deposit sitting on the surface of the paver or in the joints, made of mineral salts that migrated up through the concrete as water evaporated. Unlike blushing, it brushes or washes off relatively easily because it sits on top of the material rather than inside a sealer film.
Joint-sand failure shows as sand washing out, sinking, or crumbling between pavers, sometimes paired with weeds or ant activity in the gaps.
Run this quick three-step check before you do anything else:
- Look: Is the discoloration uniform across the whole patio or patchy and localized near low spots and shaded areas?
- Touch: Does it feel like a powder that transfers to your fingers, or a hard, glossy film you can peel at the edge?
- Test: Rub a small hidden section with a rag dampened in mineral spirits or xylene. If the haze lightens or disappears, you're likely looking at a solvent-based sealer with trapped moisture, a good candidate for a DIY spot test.
If the small-sample test does nothing, or if you're dealing with a water-based sealer that's peeling in sheets, stop experimenting and start planning for professional stripping instead. Guessing wrong here wastes product and time.
Why Paver Sealers Fail in the First Place
Sealer failure almost never comes from a bad batch of product. It comes from a mismatch between the sealer, the conditions it was applied in, and the surface underneath. Paving Expert's technical analysis points to four recurring causes: residual moisture in the paving, rain or high humidity during application, the wrong sealer type for the situation, and poor surface preparation. Nearly every failure you'll encounter traces back to one or more of these.
- Residual moisture and capillary action. Pavers, the sand bedding underneath, and the joints between them all hold water. That water doesn't just sit still. It moves upward through capillary action, especially as the ground warms during the day. If you seal over a surface that looks dry on top but is still damp two inches down, that moisture eventually has to escape. It pushes through the cured film as vapor, and that's what causes whitening, bubbling, and peeling weeks or months after a seemingly clean application.
- Wrong sealer chemistry for the climate. Solvent-based film-forming sealers create a tight, glossy, non-breathable barrier. They look great on day one. But on pool decks, coastal properties, or anywhere with a high water table, that barrier traps moisture instead of letting it escape. Field reporting from humid Florida climates shows this pattern constantly: sealers that perform fine in dry inland climates turn cloudy white within a season near the coast, simply because the film can't breathe. Breathable, penetrating sealers handle that same moisture load without trapping it, though they typically need more frequent reapplication.
- Application during the wrong weather window. Rain, dew, or even heavy overnight humidity during the cure window can ruin an otherwise correct sealer choice. Manufacturer guidance and specifications like the New York State DOT sealer application spec require dry surface conditions, minimum ambient and surface temperatures, and no risk of precipitation during the drying period. Skip any of those requirements and you're rolling the dice.
- Contaminated or improperly prepped surfaces. Dust, old sealer residue, efflorescence salts, or algae left on the surface before sealing all interfere with adhesion. A sealer applied over any of these bonds to the contaminant instead of the paver, and it fails from day one rather than developing problems over time.
- Over-application and incompatible layering. Piling on thick coats to "make sure it's covered" is one of the most common paver sealing mistakes homeowners make. Thick films trap solvents and moisture as they try to cure, leading to a soft, tacky, or hazy finish. Mixing chemistries, applying a water-based sealer over an old solvent-based film without stripping first, causes poor adhesion and patchy peeling almost immediately.
- Joint-sand erosion feeding back into the problem. Once joint sand washes out or erodes, water finds an easier path into the base layer. That accelerates the very moisture problems that cause sealer failure in the first place, creating a cycle that gets worse each season if left alone.
Fixing Failed Paver Sealer: A Step-by-Step Repair Path
Not every failure needs the same fix. The right repair depends on how far gone the sealer is, what chemistry you're dealing with, and how widespread the damage looks.
Start small: the xylene test for solvent-based sealers
If you've confirmed you're dealing with a solvent-based acrylic sealer showing early whitening, xylene re-emulsification is worth trying before you commit to a full strip. Xylene temporarily softens the cured film, allowing trapped moisture vapor to escape, then the film re-hardens as it flashes off. This works because the same solvent chemistry that formed the original film can re-dissolve and reset it.
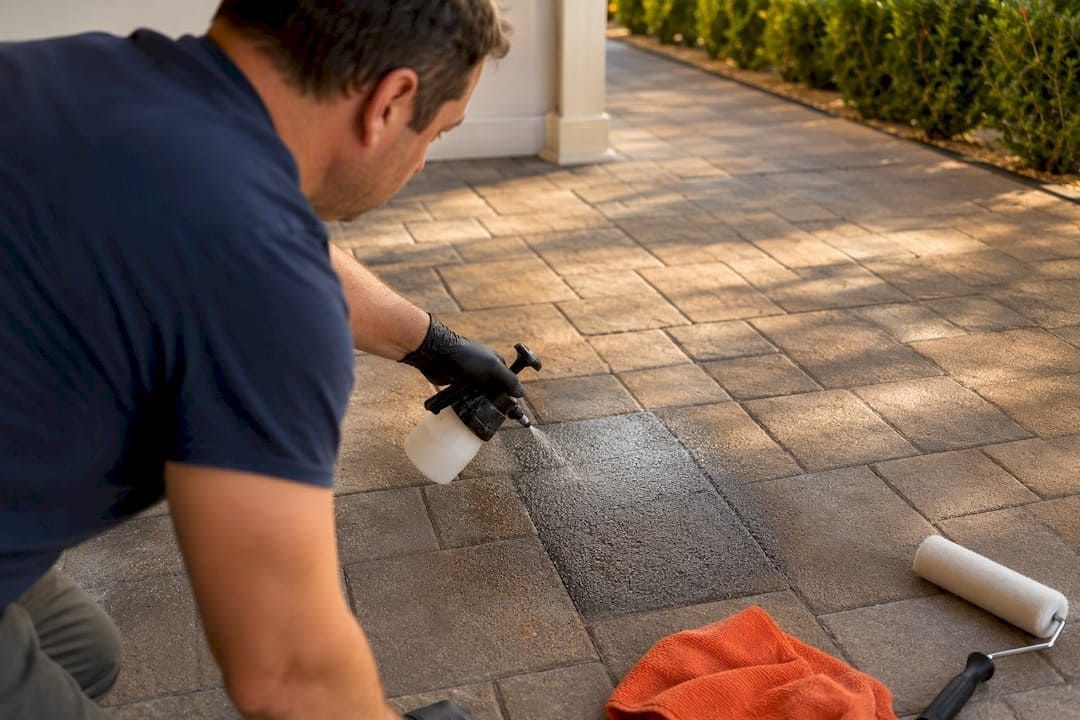
Apply xylene evenly with a pump sprayer or roller over a small test section first, roughly one to two square feet in an inconspicuous corner. Watch for the haze to clear as the solvent flashes off, usually within 15 to 30 minutes depending on temperature. If it clears and the surface looks glossy and even again, you can scale up to the full affected area.
Pro Tip: Work in sections no larger than what you can finish in 20 minutes, and always work with the wind at your back. Xylene fumes are flammable and shouldn't collect in enclosed patio areas or near pool equipment rooms.
Two important cautions apply here. First, this technique only works on solvent-based acrylic films. Water-based sealers don't respond to xylene the same way and generally need complete stripping instead. Second, if your pavers sit adjacent to a pool, keep xylene and rinse water well away from the water body. It's not a chemical you want anywhere near pool circulation systems.
When the damage is widespread: strip and start over
If more than a small section shows whitening, if the sealer is a water-based product, or if the xylene test on a hidden patch didn't resolve the haze, stripping is the only reliable path forward. Attempting to seal directly over a failed coat almost always makes things worse, since the new sealer bonds to a compromised layer instead of clean paver material.
Chemical strippers formulated for the specific sealer chemistry (acrylic versus polyurethane versus epoxy) break down the film so it can be rinsed or pressure washed away. Polyurethane and epoxy coatings typically need more aggressive strippers or mechanical removal, since they don't respond to the same solvents that work on acrylics. A pressure washer set between 3,000 and 3,500 PSI with a rotating nozzle usually finishes the job, working in slow, overlapping passes to avoid gouging softer paver materials like clay brick.
Cleaning efflorescence without stripping
If your diagnosis points to true efflorescence rather than sealer blushing, you may not need to strip anything. An acid-free efflorescence cleaner formulated for hardscapes dissolves the mineral deposits without damaging the paver surface or any intact sealer nearby. This is worth doing before you assume the whole sealer job has failed. Our efflorescence removal guide walks through the process step by step. That said, if efflorescence keeps returning within weeks, it usually points to an ongoing moisture source underneath, and stripping and resealing with a breathable product becomes the more durable fix.
Rebuilding eroded joints
Once you've stripped and rinsed the surface, inspect the joints. Any sand that washed out, sank, or crumbled during the failure needs replacing before you reseal. Sweep in polymeric sand, following the manufacturer's compaction and misting instructions closely, and let it cure fully, typically 24 to 48 hours, before applying any new sealer. Sealing over compromised or low joints just traps water in the same spots that caused problems the first time.
What to expect: time, cost, and effort
A small-area xylene test and touch-up can realistically be a weekend project. Full stripping, joint repair, and resealing of an average patio or pool deck is a multi-day process once you factor in stripping time, a full rinse and dry period, joint sand curing, and the new sealer's own cure window. Costs scale with square footage and whether you hire out the stripping labor, but the larger expense is almost always time: rushing the dry-out period between steps is exactly what caused the original failure.
Preventing Paver Sealer Problems Before They Start
Every failure mode above traces back to timing, weather, product choice, or technique. Fix those four variables and you eliminate most paver sealing problems before they happen.
- Wait long enough after installation. New pavers need time for the concrete to cure and for efflorescence to work its way out naturally, typically an 8 to 12 week window before the first sealing. Sealing too early traps that natural efflorescence process under the film, causing issues typically within a few months after installation.
- Confirm a real dry window. A practical rule of thumb is several consecutive bone-dry days in summer conditions, longer in cooler or more humid seasons, with no rain, dew, or fog expected during the cure period. Beyond the surface, check the base: power washing should happen at least 14 days before sealing to give the bedding and sub-base time to dry out fully. You can probe joint depth with a screwdriver or moisture meter 10 to 15 millimeters down to confirm dryness before committing to a full application.
- Follow temperature and procedural specs. Guidance modeled on state transportation department standards for sealer application calls for minimum surface and ambient temperatures, manufacturer instructions on hand before work begins, and two-coat application with the second coat applied perpendicular to the first for even coverage.
- Match the sealer to the site. Pool decks, coastal properties, and shaded or poorly drained yards all benefit from breathable, moisture-tolerant sealers rather than heavy film-forming solvent products. Never layer a water-based sealer over an old solvent-based coat, or vice versa, without stripping first.
- Apply thin, even coats correctly. Use the roller or sprayer type the manufacturer specifies, apply in a cross-coat pattern, and let each coat flash (the point where it's tacky but not wet) before adding the next. Don't thin the product unless the label explicitly allows it, and clean your tools between coats so dried residue doesn't create texture problems.
- Build a maintenance rhythm. Inspect your sealed surfaces annually, especially after harsh winters or heavy pool season use. Recoat intervals depend heavily on the product, breathable sealers often need refreshing every one to three years, while heavier film sealers can last longer but fail more dramatically when they finally do. Always test adhesion on a small patch before committing to a full recoat.
| Prevention step | Timing or spec | Why it matters |
|---|---|---|
| Wait after new installation | 8 to 12 weeks | Lets efflorescence dissipate before sealing traps it |
| Dry window before application | 3+ bone-dry days (longer if cool/humid) | Prevents moisture from getting trapped under the film |
| Power wash to sealing gap | 14+ days | Allows bedding and sub-base to fully dry |
| Joint moisture check | Probe 10 to 15mm deep | Confirms joints are dry, not just the surface |
| Recoat interval (breathable products) | 1 to 3 years | Matches typical wear cycle for moisture-tolerant sealers |
The Eco-Friendly Approach to Paver Sealer Repair and Prevention
Fixing a failed sealer job doesn't have to mean reaching for harsh acid strippers or solvent-heavy cleaners that leave fumes lingering around a patio or pool deck for days. The product lineup is built around plant-based, low-VOC formulas designed for use in residential settings such as near pools, pets, and children.
- For efflorescence removal , an acid-free cleaner lifts mineral deposits without etching the paver surface or harming nearby plants and pool water chemistry.
- For prevention , breathable protectors let trapped moisture vapor escape through the film instead of blistering it, which matters most on pool decks and humid-climate patios where non-breathable sealers fail fastest.
- For ongoing care , a low-VOC formula means you're not stuck airing out the yard for days after a touch-up application.
Where an eco-friendly cleaner falls short is on severe, widespread film failure. If a solvent-based sealer has peeled across an entire patio, a professional-grade stripper is still the faster and more reliable path. Save the gentler products for efflorescence cleanup, spot maintenance, and prevention work, and reach for stronger chemistry only when the failure is truly beyond a surface-level fix.
What Contractor Shortcuts Actually Cause These Failures
Most sealer failures I've seen traced back to skipped waiting periods, not bad products. A crew power washes a patio, and instead of waiting the recommended 14 days, they seal the next morning because the schedule says so. Another common shortcut: diluting sealer to stretch coverage across a bigger job, which weakens the film and invites exactly the moisture problems this guide covers.
Before hiring anyone, ask for the specific product name and chemistry, the planned drying window between coats, whether they're doing one coat or two, and what their policy is if the sealer fails within the first season. Ask how they've handled humid or coastal conditions before. Red flags include no written application plan, resistance to doing a small test patch first, and vague answers about what happens if rain shows up mid-job.
Where to Find Eco-Friendly Sealer Repair and Prevention Products
Oceancarestore gives you a plant-based, low-VOC alternative to the harsh acid strippers and solvent-heavy sealers that dominate most hardware store shelves, without asking you to compromise on results for efflorescence cleanup or breathable surface protection.
If your diagnosis points to efflorescence rather than a fully failed sealer coat, the Home Essential Cleaners line includes acid-free formulas built for exactly that job. For prevention and recoating after a repair, the Stone & Grout Sealers category covers breathable protectors suited to pool decks and humid climates, the kind of product that avoids the trapped-moisture failures this guide walks through. Whatever you choose, always run a small test patch first and follow the label's dry-time and temperature guidance to the letter. Browse the full lineup at Oceancarestore to find the right starting point for your specific surface and climate.
Sources
FAQ
Is There a Downside to Sealing Pavers?
Sealing isn't risk-free: applying the wrong chemistry for your climate, sealing too soon after installation, or working in damp conditions can trigger the exact whitening and peeling problems this guide covers. Done correctly, with the right product and a proper dry window, sealing protects pavers far more than it risks damaging them.
How Long Should You Stay Off Pavers After Sealing?
Most sealers need at least a day or two of foot traffic avoidance and longer, often several days, before vehicles or heavy furniture return. Always check the manufacturer's label, since cure times vary by product chemistry and weather conditions during application.
What Do Professionals Use to Seal Pavers?
Professionals choose between solvent-based film sealers for a glossy, wet look and breathable water-based or penetrating sealers for moisture-prone sites like pool decks and coastal properties. The right choice depends heavily on climate and application, which is why Oceancarestore's Stone & Grout Sealers line focuses on breathable formulas suited to humid and pool-adjacent conditions.
Is It Better to Spray or Roll Paver Sealer?
Both work, but the right tool depends on the product and the texture of your pavers. Sprayers give faster, more even coverage on large flat areas, while rollers offer more control on textured or tumbled pavers where sprayed sealer can pool in low spots; manufacturer instructions usually specify which method to use.
How Do I Know if My Paver Sealer Failure Needs a Professional?
If whitening or peeling covers more than a small test patch, or if a hidden-area xylene test doesn't clear the haze, you're likely dealing with a failure that needs full stripping rather than a DIY touch-up. Water-based sealer failures in particular tend to need professional-grade stripping rather than a solvent spot fix.

